
FreeTSA - Guide: How to sign documents files with time stamp > PDF Signer 8.x
PDF Signer is a commercial program whose purpose is to sign existing PDF documents.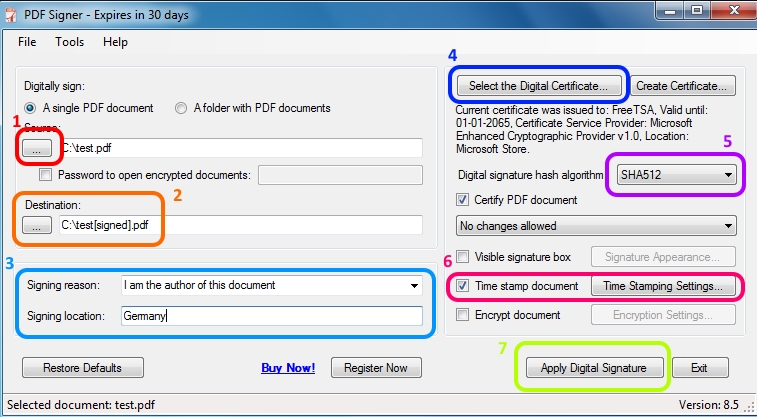
1 - Here you can select your PDF file to be digitally sign.
2 - Here you can select the destination of the digitally signed PDF file and you can rename it.
3 - Optional. You can add the signing reason and signing location.
4 - "Select the Digital Certificate..." here you can choose the digital certificate that you want to use from the Windows Certificate Store or from a pfx file (more information in the picture bellow).
5 - It is recommended that you select as Digital signature hash algorithm "SHA512".
6 - Activate this option "Time stamp document" to have your document digitally time stamp by FreeTSA time stamping service.
Click in "Time Stamping Settings..." to set the values (more information in the second picture bellow).7 - After everything is to your taste just click on "Apply Digital Signature". A new PDF signed should be created.
8 - Here you select your digital certificate from the Windows Certificate Store.
If you prefer you can use your PFX digital certificate file from the bellow option.
Make sure "Include certificate revocation information - Long term signature (LTV)" is enable to avoid errors after certificates expire;
9 - Click "OK" to apply changes.
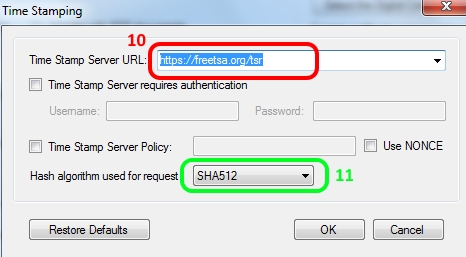
10 - Here you enter the URL: https://freetsa.org/tsr
11 - Please choose "SHA512" hash algorithm used for request.Click "Ok" to accept the changes.
This program has more features, that you may want to use, explore the program to understand all the functionalities.
Last update: October 2, 2015